Sussing my seacocks

Sampaguita’s cockpit drain seacocks. This photo is post repair. The one on the left was the leaker. The seacock on the right is an example of the previous putty jobs. The smaller inner tube into the orange juice jug is drainage for the ice box.
I came to the conclusion one of my cockpit drain seacocks was leaking. Well, not actually the seacock, but the elbow attached to it. I actually think it might have been amiss for a long time but I just officially realized it. The leak was so slight that a small 2 or 3 drip puddle of water was all there might be in the bilge, and sometimes nothing. I finally saw the trail of water from under the elbow and down the seacock. Anyway, once I came to the confident conclusion that it was leaking, there was no turning back and no letting it go. Time to explore.
I did my normal over investigation and research but I am uncertain what the original build on this particular boat was. There are four components to the cockpit drain. Top to bottom, there is a plastic cockpit drain, a hose, a Marelon(plastic) elbow and a bronze thru-hull/seacock. The seacocks are original. They are the Groco SV-1250, an old design that hasn’t been made since 1992. While obsolete, they are still solid and I feel confident in them. The cockpit drains are original. I come to this conclusion because they look as they are the original install. The hoses are consistent with each other and it is the same type of hose used for the manual bilge pump set up. Either these were all replaced together or they are the original install. This leaves the elbows. The Marelon is a solid product, but why not bronze elbows? Why was the putty used to seal the elbows so sloppily done? Was this factory installed or a later repair?
I closed the seacock and removed the hose from the elbow. Good news is the seacock closes and seals properly. I have opened and closed the seacock before, but with the hose on, you cannot tell if it actually is working as it is supposed to. More good news is that the seal between the hose and the elbow is very tight, even with the hose clamps removed water did not seep through. I used a steamed cloth to soften the hose for easier removal.
With the hose off, I was then able to easily break the putty seal and unscrew the elbow from the seacock by hand. My research informed me that I need to use a sealant when installing Marelon elbows to make the connection water tight. This delicateness was an eye-opener in a system that I wanted to be bullet proof. Would the bronze elbows be better?

The seacock with the elbow removed. No leakage from the inner plug. The bronze looks solid, however there was some corrosion on the top edge of the threads. You can see the off-color on the top ring. I established this was not a safety issue but took note of it as something to keep an eye on.
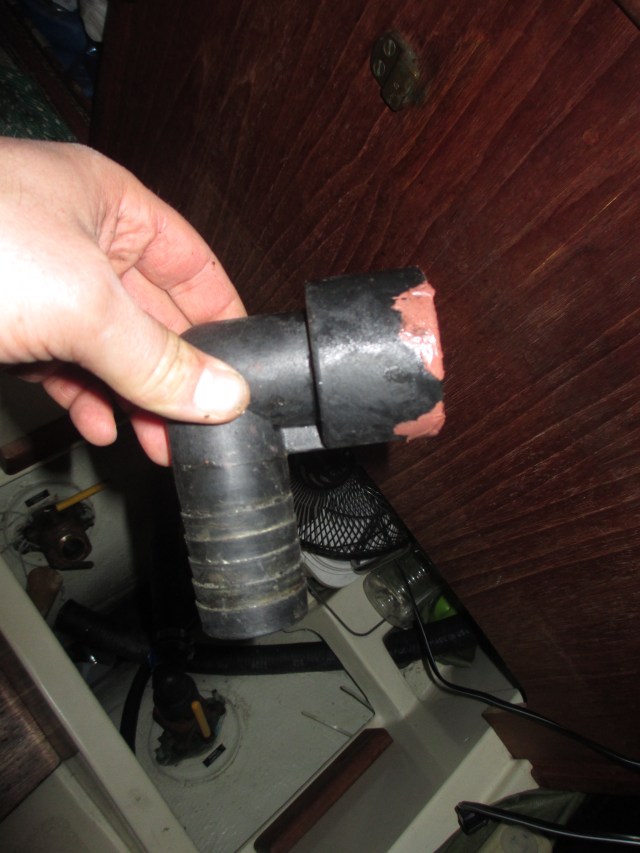
The Marelon elbow

I picked up the appropriate bronze elbow (TPC-1250) from the marine store to test it out. It is a sturdy feeling piece of hardware with a neoprene gasket that will make the hard mechanical seal I imagined in a strong system. The first thing I noticed was that the bronze elbow does not have any hose barbs on the end for added sealing security. I imagined this would be alright, however the second thing I noticed was that the hose end of the elbow was only 1.25″ in O.D. while my existing hose was 1.5″ I.D. This was going to be a problem and it shed some light on why the system was as it was.

The underside of the cockpit drain and laundry detergent.
The installed cockpit drains were sized to have a 1.5″ I.D. hose on them. To change the hose size would mean changing the cockpit drains too (a sizable production) or add an adapter (less production) which would decrease performance and increase fragility and complexity to the system. On the other end, we could increase the seacock size (very major production) to match the drain and hose size. The Marelon elbow was the apparent solution for mating the 2 different sizes together.
My hopes of improving the system beyond the present were dashed as I am presently unwilling to take on the major production of rebuilding the cockpit drain/seacock system. So I cleaned up the pieces, bought some Teflon tape, practiced assembling the system a couple of times to be confident in the seal and tightened it up. I chose the Teflon tape as it cleans up so easily on disassembly. If I find it doesn’t last, I can give the putty a go.
I did fix the leak…for now. I’ll keep my eye on it for sure. The repair, while important, was so small in comparison to the exploration of the system. Hours of fuss only to fix it with a screwdriver and $1.31 of Teflon tape. On the other hand, I have a very comprehensive understanding of the system, it’s maintenance and how I would rebuild it differently to make it better if I were so inclined. So I’ve got that going for me.
Over the years, as minor changes were made to the design of the Flicka 20 in response to real world feedback and changing technologies, certain solutions were adapted to facilitate the changes. I speculate that the Marelon elbows were a factory install as an adapter to facilitate these design changes. When I peeled away the old putty, the bronze underneath has a fresh look so I could even believe the sloppy putty job could be from the factory.

The new seal with the Teflon tape.
Discover more from Sailing With Josh
Subscribe to get the latest posts sent to your email.


